
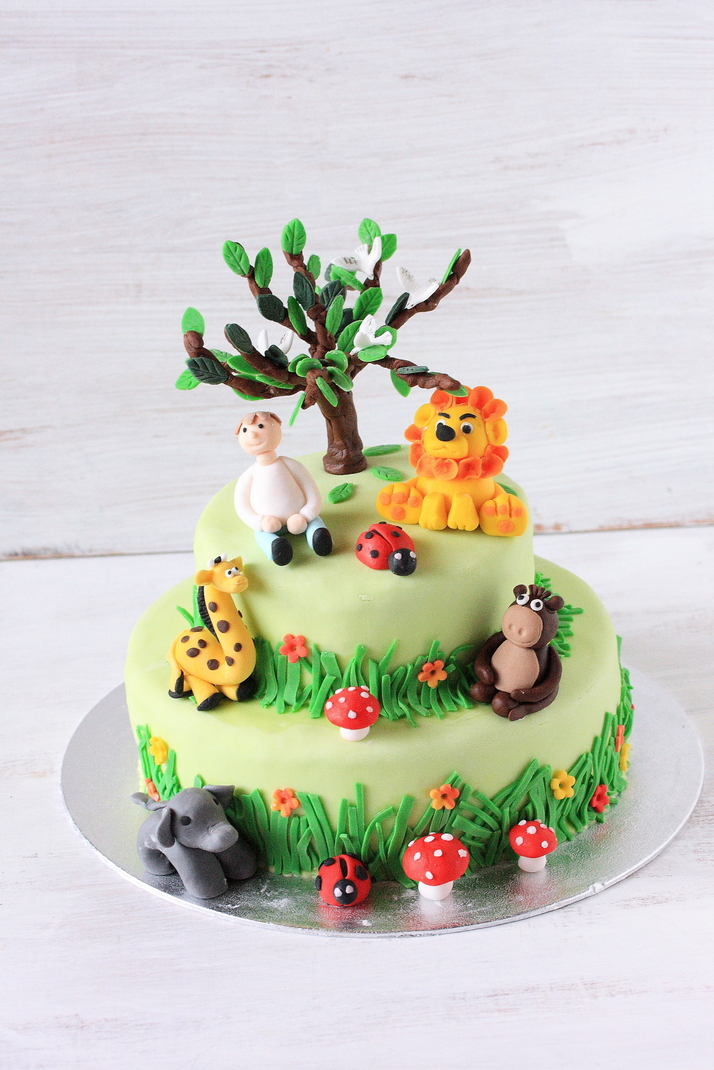
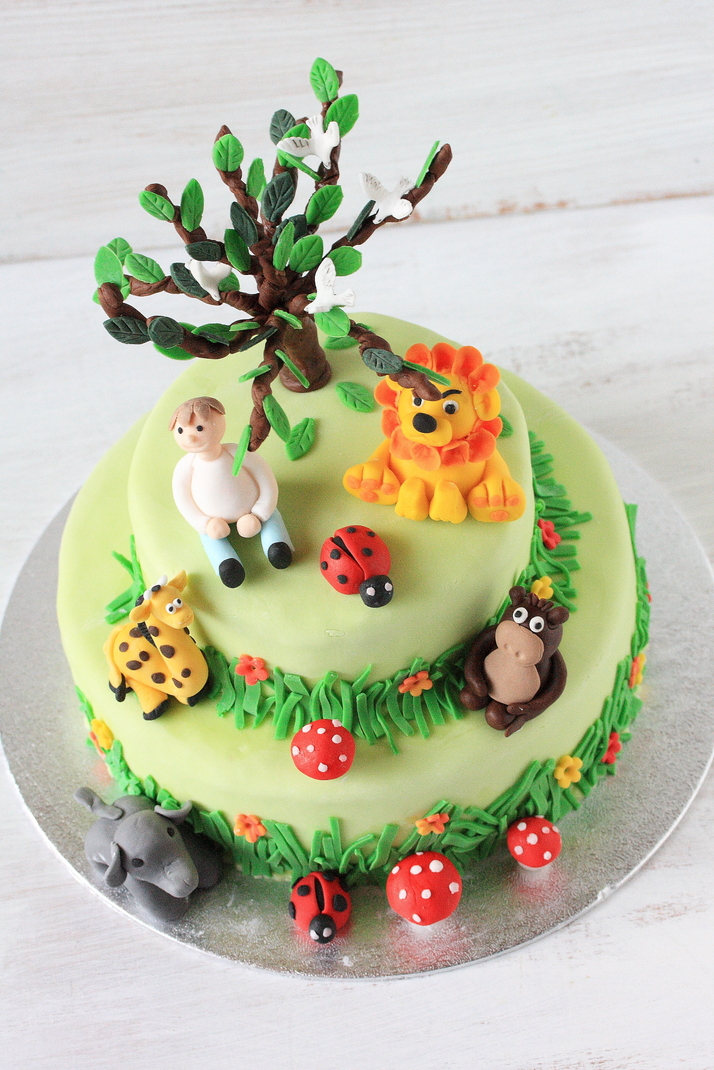
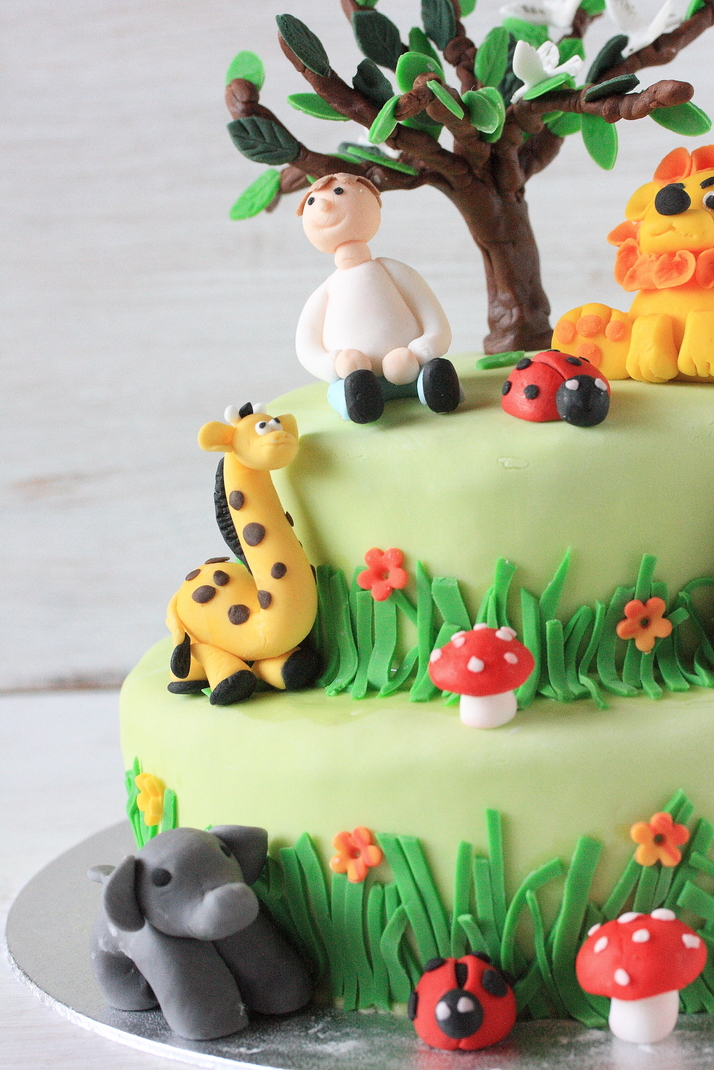
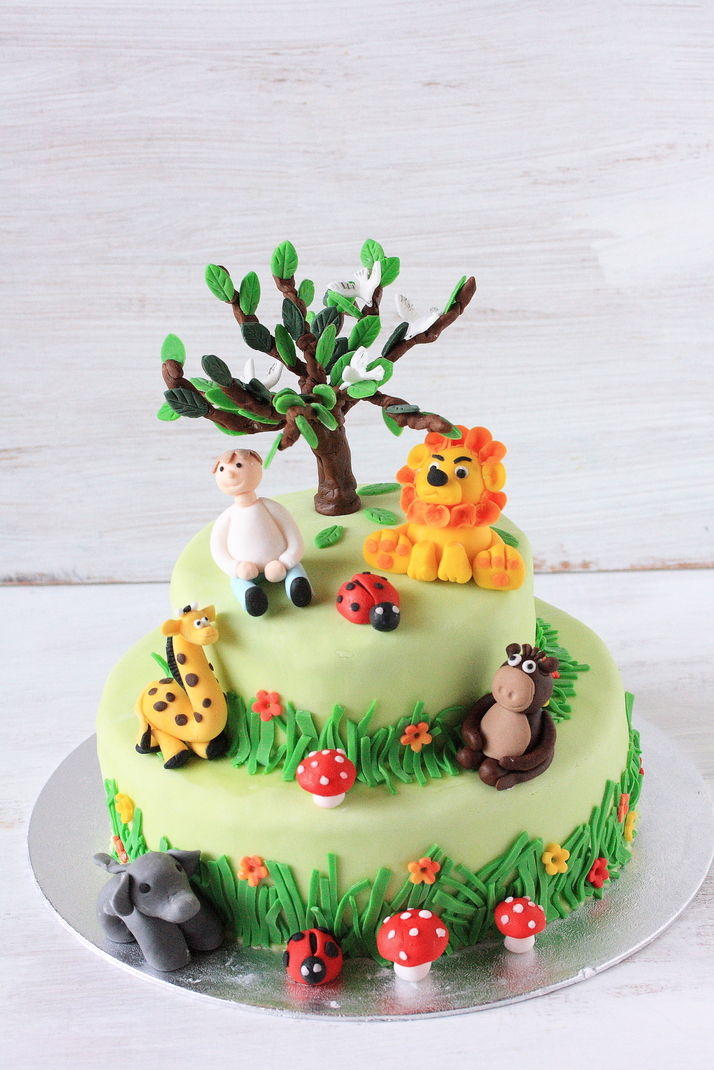
Spring is in air. The greenness, freshness, delicate fragrance, aren’t you enjoying the beautiful time of the year? Belgium is just warming up, with occasional showers which makes the green look greener. How are you all enjoying your spring? I’m quite occupied in learning dutch, redeeming the slumbered language part of my brain, believe me people it is one full job in hand, but it’s certainly fun (I say this to myself, as process of self encouragement)! In addition to language- the so called fun, craziness of life, cake is and will always be there on my priority list. This cake was one of those cakes that I dreamt all along the days until it took shape. The Forest theme cake was designed for a two year old little one, who’s name means forest. I have to admit creating every bits and pieces of this cake was an intensive fun. My creative thoughts ran really wild along with wild life modelling. It also brought my hidden childhood love for wildlife. Though I would be really scared in reality to take pictures of wild animals, I really wish I have the courage to do it. If not in real life there is always a fantasy world, so creating modelling of adorable wildlife made me a happy girl!
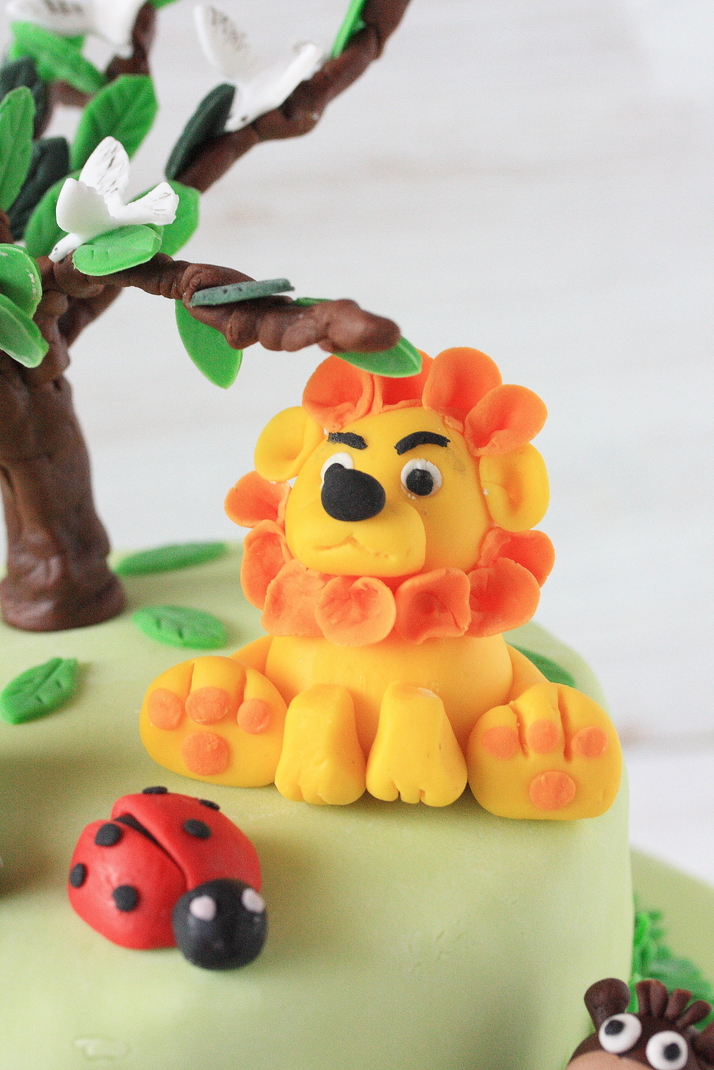
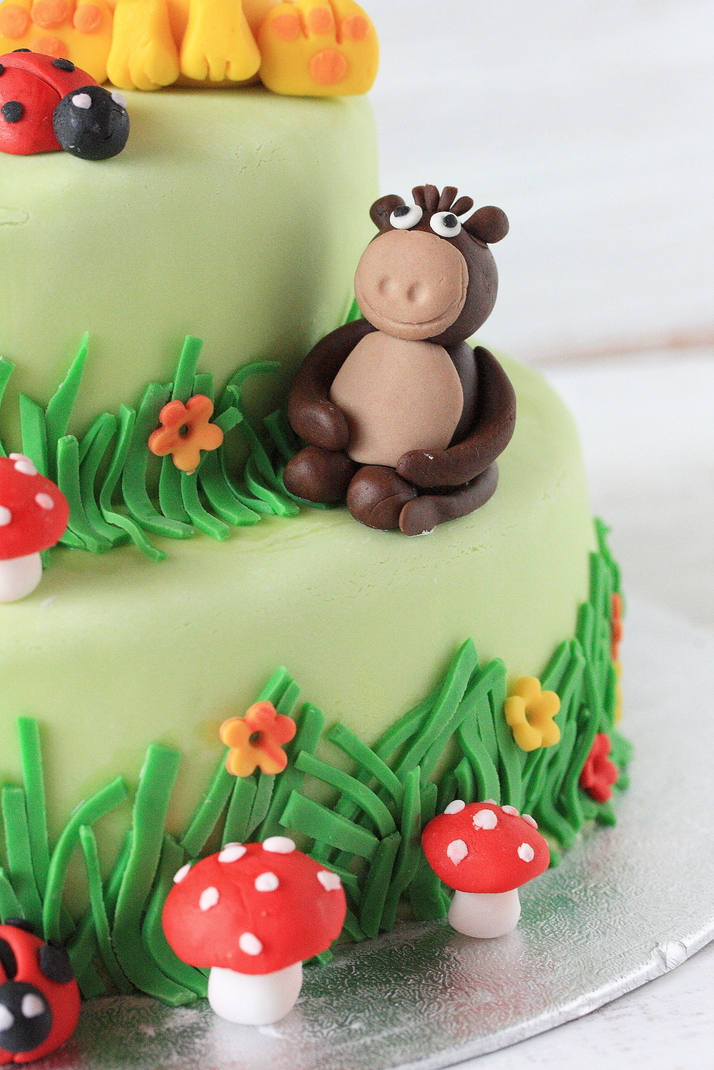
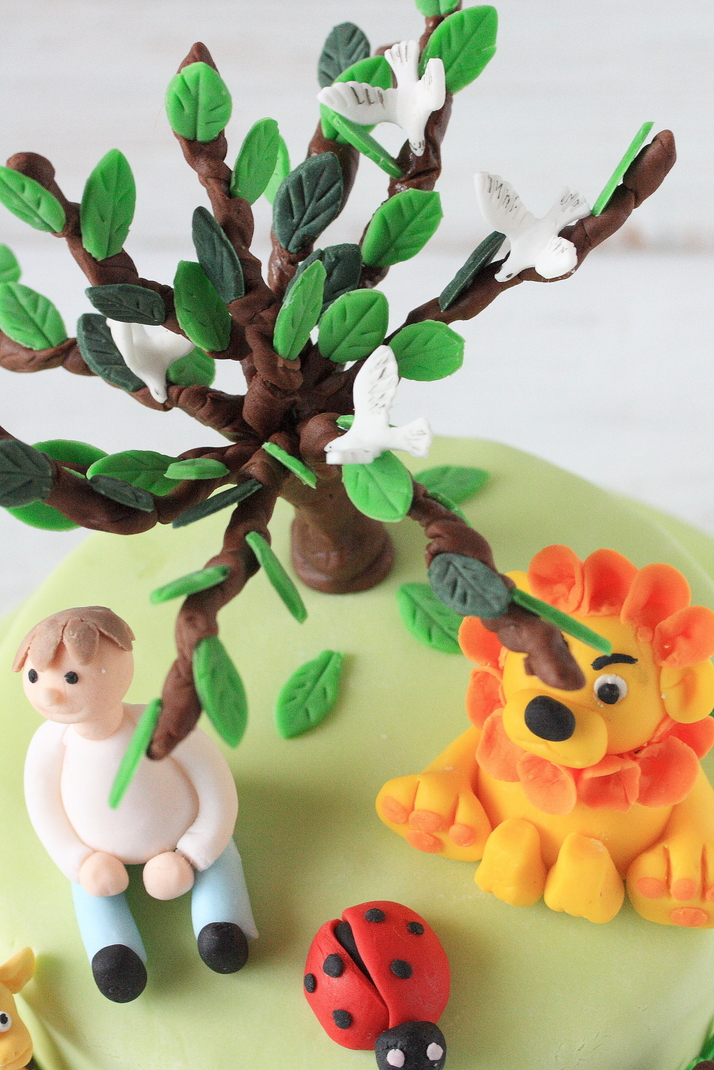
Every stages of this cake was designed with at most care keeping the little one in mind. I made sure, the colours and figures are attractive in the first place. As I have been mentioning before, I’m a youtube learner, all the animal figures were made seeing the youtube tutorial. All the models were made two to three days before, this helped to speed up the final layering and decorating process. Also when figures get dried, they get firmer and retains shape well. The tree and grass was my own creative idea. The base of the tree is made using floral wire and tapes, that is generally used for making fondant flowers. After giving the base, I twisted the brown fondant along the wires to give it a natural look, and very carefully two shade leaves were inserted into the fondant. The grasses were thin strips of green fondant that was irregularly cut and very random placed along the base if the two cakes.
Both the tier cakes was two layered brown butter cake. I sandwiched the cake layers with cardamon mascarpone cream. For frosting I used swiss meringue butter cream frosting with cardamon flavour. Brown butter always reminds of the clarified butter (ghee) that is commonly used for making Indian sweets and Indian sweet is incomplete without the flavour of cardamon.
Ok folks, I hope you all will enjoy virtually this forest theme cake as much as I and the little birthday boy did. I was informed by his mom that, he was beaming with happiness when he saw the cake and he enjoyed eating parts and bits of all the models. There is nothing more happier than this feedback for a cake maker.

Ingredients
- This recipe makes one 23 cm cake and one 16 cm cake.
- Unsalted Butter - 300 gram
- All Purpose Flour - 360 gram
- Baking Powder - 4 tsp
- Milk - 240ml
- Vanilla Extract - 2 tsp
- Granulated Sugar - 330g
- Eggs - 4 large
- Salt - 1/4 tsp
- Mascarpone Cream - 500 gram
- Fresh Cream - 200 ml
- Sugar - 125 gram
- Cardamon powder - 1/2 to 3/4 tspn (depending on the how strong you want the flavour to be)
- Egg whites - 75 gram
- Castor Sugar - 250 gram
- Butter - 170 gram (cut them in cubes, it should not be cold but cool)
- Vanilla extract - 1/4 tspn
- Cardamon powder - 1/2 tspn
Instructions
- First prepare the brown butter a day before so it cools down to room temperature.
- Melt the butter cubes in small heavy bottom saucepan on medium heat.
- After the butter melts completely, stir the frequently until the milk solid starts to turn golden brown and you get subtle sweet and nutty aroma.
- At this stage take it immediately off the heat as the hot melted butter keeps cooking for a while, or might have to take care to remove the pan bit early, so you don't end up burning the butter.
- Let the melted butter cool over night at room temperature, which I prefer. Quicker version works if you place the butter in freezer, but may sure you remove in advance so it reaches room temperature while preparing the cake.
- Preheat oven to 180°C
- Line the bottom of one 23 cm and one 16 cm round cake pan with baking paper/ parchment papper and butter the sides of the cake pan.
- In a bowl, sift together the flour, baking powder and salt.
- In a big bowl beat the brown butter, sugar until soft and creamy using a electric mixer.
- Next add eggs, one at a time and beat until well combined after each addition, on medium speed.
- Add the vanilla extract and beat until combined.
- Add the flour mixture in three parts along with milk fold gently (or beat on low speed) until well combined and smooth by occasionally scraping bowl with a spatula. .
- Divide the batter between the two prepared pans.
- Bake for 30 to 35 minutes or until a toothpick inserted into the center of the cake comes out clean.
- Place the baked cakes on a wire rack to cool,
- Cool the cakes completely to room temperature before frosting.
- Combine sugar, fresh cream and beat until soft stiff peaks are formed.
- Carefully add the mascarpone cheese and cardamon powder to whipped cream and beat on low speed until well combined and single stiff peak is formed.
- Clean the whipping bowl with lemon juice to remove any grease left behind.
- Add castor sugar to egg whites and let them simmer over a pot of water, make sure not to boil the water, as it will curdle the eggs.
- Gently keep whisking the egg.
- Use candy thermometer to measure the temperature, constantly whisk until temperature reaches 70 C, if you don't have a candy thermometer keep whisking until the sugar gets completely dissolved in egg whites and mixture is hot. The mixture at this point might start to look glossy.
- Take the bowl out of simmering water and start to whip until the meringue is thick, glossy. At this point bottom of the bowl feels neutral to the touch. This took around 10 to 15 minutes.
- When bowl temperature reaches normal temperature slowly start adding butter cubes, one at a time
- and start to whip with mixer on low speed until well incorporated. Keep whipping until a silky smooth texture is obtained. Don't add butter if the bowl feels warm.
- Incase if the mixture curdles keep whipping until it returns to smooth texture. If mixture gets too runny, refrigerate for about 15 minutes and continue whipping until it comes together.
- Add vanilla extract, cardamon powder and continue to whip on low speed until well combined.
- Half both the cake with cake leveller.
- Start with second tier - the bigger cake.
- On a rotating cake stand, first place top halve of the cake, spread 3/4 of the whipped mascarpone cream.
- Do not spread the cream too much towards the corners.
- Place upside down the second bottom half of the cake
- Frost evenly and smoothly the top and side of the cake with cardamon swiss meringue buttercream using angled spatula.
- Place the cake in the refrigerator for the buttercream to set, before starting with fondant decoration.
- Repeat the process for the first tier with rest of the whipped cream and frosting. Place the cake in the refrigerator for the buttercream to set.
- Roll green pastel fondant/sugar paste to about 5mm thickness and place them on the cake and smoothen it out evenly. Cut the excess fondant.
- Repeat the process individually for both the cakes.
- Place the first tier on the second tier cake.
- Then slowly arrange the tree, boy, animal model, lady bug and mushroom. Use your creatively play with it.
- Next stick randomly, the grass along the bottom edge of the cake.
- I used edible glue to stick the fondant decoration on the cake.
- Happy baking and enjoy the fun with fondant.
- _ All the models were made two to three days before, this helped to speed up the final layering and decorating process. Also when figures get dried, they get firmer and retains shape well. The lion, elephant, giraffe, monkey, boy and lady bug was made by seeing couple of tutorials on you tube. The base of the tree is made using floral wire and tapes, that is generally used for making fondant flowers. After giving the base, I twisted the brown fondant along the wires to give it a natural look, and very carefully two shade leaves were inserted into the fondant. The grasses were thin strips of green fondant that was irregularly cut and very random placed along the base if the two cakes. _


Wow, you really are so very talented. I love this post so much, I deco verde I had a bit of a passion for cake decorating myself in recent weeks, nothing like this, but my puppy cupcakes turned out a treat.
Hope you’ve been well!